Pods is a WordPress plugin or more appropriately framework for WordPress that allows you to create, extend, manage, and deploy customized content types and fields. If you have just installed Pods plugin in WordPress setup and activated it and you are thinking what to do next then this tutorial is for you. This is a basic step by step tutorial for tasting what Pods can offer and be ready to dive into it.
Here we are going to setup Pods for creating content type ‘Phone’ in which it would contain basic features like title, introduction, picture, OS, screen size, etc. We will then make the listing page of phones in the front end and also page for displaying content of the single phone. Pods 2.1 is used in this tutorial.
Pods setup
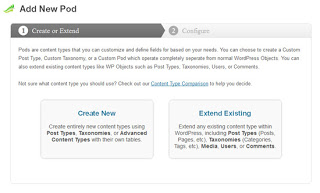
- When you click Pods Admin available in the sidebar after activating the Pods plugin, you get following in the screen.

- Click Create New. You will get a form to setup new content. Enter ‘Phones’ in Plural Label box and ‘Phone’ in Singular Label box. Select Content Type ‘Custom Post Type (like Posts or Pages)’ as default. If you want to learn about content types available, you can see this link
- Click Next Step
- Our Phone pods in created. Now we are ready to add fields we want to add about Phone. Click Add Field.
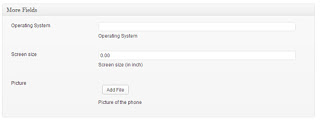
- Enter ‘Operating System’ in Label. Label is how the field is displayed in the UI. When you focus out from the textbox, Name should be ‘operating_system’. This is the name which we will need in future to access data programatically. In Description enter description of the field. Select Field Type as Plain Text. There are lots of options for different types of fields.
- Click Add Field just below the new field form to add field.
- Similarly add new field for Screen Size. Label : Screen Size. Name : screen_size. Description : Screen Size (in inch). Select Field type as Plain Number. In Additional Field Options, enter 2 in Decimals textbox.
- For picture, we need to add another field. Label : Picture. Name : picture. Description : Picture of the phone. Select File/Image/Video in Field Type
- Click Save Pod
Setting up Pages
- Pods comes with builtin components named Pages and Templates. It may not be activated in first installation. If not then, go to Components under Pods Admin menu. Find Pages and Templates and click Enable if it is disabled previously.
- Ans also make sure that you have selected ‘Pretty Permalinks‘ in WordPress permalink structure.
- Go to Pods Admin > Components > Pages menu.
- Click Add New
- Enter ‘phones’ in the main textbox (showing Enter URL here) and paste following code in the ‘Page Code’.
<?php


//parameters for getting Phones list

//for fetching Phones latest first order and 2 in each page

$params = array( 'orderby' => 'post_date DESC', 'limit' => 2 );


//creating Pods

$phones = pods( 'phones', $params );

//fetch and display using template

echo $phones->find( $params )->template( 'phone_list' );

//display pagination

echo $phones->pagination();


?>
- This is the listing page og Phone pods
- Click Publish to save.
- Again click Add New
- Enter ‘phones/*’ in the main textbox and paste following code in the ‘Page Code’.
<?php //get variable from the URL $slug = pods_url_variable('last'); //condition to fetch the Pods based on the $slug $params = array( 'where' => 'post_name = "'.$slug.'"' ); //display Pods using template echo pods( 'phones' )->find( $params )->template( 'phone_detail' ); ?> - Click Publish to save.
- This page is for displaying description of single Pods.
Setting up Templates
- As you have noticed, in the above code there is use of two templates ‘phone_list’ and ‘phone_detail’. Those pages would use that templates to display the data grabbed from the Pods.
- Go to Pods Admin > Components > Templates menu.
- Click Add New
- Enter ‘phone_list’ in the main textbox (showing Enter Template name here) and paste following code in the ‘Content’.
<h2><a href="{@detail_url}">{@name}</a></h2> <div> {@post_content} </div> <p>Screen Size : {@screen_size} inches</p> <p><img src="{@picture.guid}" width="200px"/></p> - Click Publish to save.
- And now lets create ‘phone_detail’ template.
- Click Add New
- Enter ‘phone_detail’ in the main textbox and paste following code in the ‘Content’.
<h2>{@name}</h2> <p><img src="{@picture.guid}" width="400px"/></p> <div> {@post_content} </div> <p>Screen Size : {@screen_size} inches</p> - Click Publish to save.
Finalizing
- Our Pods setup is complete now. So lets create some new Phone items. In the left menu in WordPress, you should be seeing ‘Phones’ menu. Go to Phones menu and click Add New
- Now you can see a familiar form along with the extra input fields. Enter phone info in the inputs. Select an image in the ‘Picture’. And then click Publish to save.
- Enter more few phones. To see pagination in the page you need to more than 2 items as we have set per page 2 items while fetching pods items in the listing page.
- To see how it looks in the front side, go to SITE-URL/phones in the browser. If you have done correctly then you can see the list of phone items.
- Click in the title of the phone and it will go to the detail page where you can see the detail description of the single phone.

See, how easily you have created custom content in WordPress with your required fields and displayed in the front end. This is not all about Pods. This is just the beginning. Try yourself and you will feel it.


Thanks a lot for this tutorial! I just installed Pods and like you said, I thought what do I do now? This gave a great intro.
Ugly tutorial for geeks…
Page names are static.
Ugly output in default templates
Pods 2.x cannot do anything more user friendly ?
What about using theme template files ?
@Anonymous
This tutorial is for understanding basics of Pods.
If you dont want to use templates of Pods, then templating of WP is also supported by Pods. Without understanding basics, advance techniques would be tough to feel, I guess 🙂
HI Nilambar, this is a big help. How would I include something like this in my actual wordpress template files?
Assuming that I wanted to include a list of each of those phones in all of my wordpress pages, how would I include the pods calls into the WP templates themselves?
Many thanks!
Thank you so much for this beginner's tutorial for Pods. I was so disappointed in the current documentation provided by the Pods developers and I was planning on deleting the plugin – I was spending too much looking up other sources for instructions on how to use the plugin. This is a big help!
Thank you for getting me started. Could you help me to create a CRUD applications using PODS?
This is about the tenth Pods tutorial I have tried and all have failed. The phones page is not showing any PHP whatsoever. Thoughts?
@ LM
I'm not sure how yours worked out but I had the same issue initially. I am using Pods 2
My problem was from the pod name. When i created new pod, the plugin automatically named it in the singular 'phone'. Nothing wrong with that except that the code above referenced the plural form;
//creating Pods
$phones = pods( 'phones', $params );
and the page was not showing as the pod couldn't be referenced by the code.
So i renamed my pod as 'phones'
hope this might be of use for other non-coders like myself, without being frustrated for a couple hours.
Nicee post
Thankyou for share
This tutorial is for understanding basics of Pods.